When my husband and I relocated to Maine, one of the first places that was recommended to us - by at least 3 different people - was Birth Roots, located on State St. in Portland. So, we took that recommendation and signed up for their breastfeeding class and their newborn care class - the "fourth trimester." These ended up being not only wonderful classes but a window into a great organization.
First up, the breastfeeding class:
The best part of this class, hands down, is that it was taught from a very positive, encouraging perspective. Unlike most breastfeeding-related avenues of information that I have explored, this class spared me the obnoxious, repetitive preaching about how formula is poison and breastmilk is "liquid gold." Thank goodness. I've heard the demonization of formula and mamas who give formula sooooo many times, and while I acknowledge that breastfeeding is at least marginally better, I don't buy into the exaggerated stuff there is out there, and I refuse to come down on mothers who formula feed. While Birth Roots definitely encourages breast feeding, they seem to make a real point of emphasizing the positives of breastfeeding without dwelling on formula. I would imagine a parent who had given formula in the past would feel perfectly comfortable and welcomed in this breastfeeding class.
Because we didn't have to dwell on breast vs formula, that freed up a lot of time for actual, helpful information. For us, breastfeeding was something we felt we should try to do, but we didn't know anything about it, and it felt like kind of a personal thing to ask our families about in detail. So this class was really helpful in demystifying breastfeeding and giving us concrete, helpful information like different holds, what a good latch looks like, what kinds of complications and issues are normal, troubleshooting, etc. The lessons of this class have stuck with us, and we have frequently remarked that this was the smartest $30 we spent during the pregnancy.
The newborn care class:
Oh my goodness, I LOVED this class. It really helped us feel less anxiety and more excitement about the arrival of our first baby. It's scary for first timers. There's nothing more intimidating than a tiny baby.
The newborn care gave us practical advice and encouragement on helping the baby transition from being on the inside to being on the outside. We got super psyched about swaddling, got tons of tips on soothing baby, and stayed after to ask about baby-wearing; the instructor was kind enough to stay and show us the Boba wrap and talk about it quite a bit, which was very helpful. The best part was that this was the clear moment, from my perspective, when the baby became a real thing for my husband rather than just an abstract concept. He just lit up talking about all the newborn care topics. Another $30 very wisely spent.
Apart from the classes, my conversations with Birth Roots staff and with people who have been to Birth Roots have been overwhelmingly positive. The Birth Roots folks are incredibly supportive and and put a whole lot of love into what they do. They're welcoming and warm, and in our situation, having just moved 700 miles and changed practitioners and hospitals and everything only 2 months before our due date, they were just what we needed to feel good about the huge changes we were weathering. Now that we have our daughter, I plan to look into postnatal classes and groups with Birth Roots.
And now, I definitely have to go change and soothe my little peanut, who's got her grumpy, waking-up face on.
Friday, March 29, 2013
Thursday, March 28, 2013
The Nursery
When we first moved into our new house, the nursery looked like this:


So, most of the walls were white, and then the one wall had these giant, bold stripes somewhat reminiscent of the Greek flag. Very cute for the nautical nursery the previous owners had, but not quite my style. Fortunately for me, my husband didn't have a lot of opinions about what he wanted the nursery to look like. He was even kind enough to repaint it in the end, despite the intimidatingly bold stripes.
I worked hard to make the nursery work with the original paint job, but after weeks of planning on changing nothing, I suddenly lost it when I realized there was no rug in the world that would look good in this room, between the color on the walls and the weird color on the floor. I finally broke down crying over it, which in retrospect was pretty stupid. But by that point in my pregnancy, my hormones were telling me that this was a Big Deal and that nothing would be ok until I got the nursery looking nice. Like somehow not only would my baby notice the color of the walls but would also care about it.
So, we revamped the whole nursery around a rug that we found on Overstock.com, the Alexa Chevron Wool Rug in Ivory and Blue. Click HERE to check it out. We really, really like this rug. It's pretty true to color compared to what you see on the website, and the only annoying thing about it is that it does have a chemical-ish smell at first, but other than that, we really love it. So does our cat, when he manages to bust into the nursery.
As a result of the rug choice, we clearly had to repaint the walls, so we picked out a light aqua color, and my very sweet husband went to work. Meanwhile, I worked on a DIY triangle bunting project.
Here are the results:


I still need to make a new lamp shade, but other than that, it's done. She won't be sleeping in there for a little while, anyway - for now, she's in a bassinet in our room.
The great thing about doing a nursery when we didn't know if we were having a boy or a girl is that it freed us up to put together a room that we like, without feeling pressured to impose some kind of gender-specific nonsense on our kid. And since the baby won't be old enough to have her own opinions about her room for a few years anyway, it seems entirely reasonable that we design the room the way we want it, because she sure as heck doesn't care. Cute as a button, but not really into interior design yet.
So, most of the walls were white, and then the one wall had these giant, bold stripes somewhat reminiscent of the Greek flag. Very cute for the nautical nursery the previous owners had, but not quite my style. Fortunately for me, my husband didn't have a lot of opinions about what he wanted the nursery to look like. He was even kind enough to repaint it in the end, despite the intimidatingly bold stripes.
I worked hard to make the nursery work with the original paint job, but after weeks of planning on changing nothing, I suddenly lost it when I realized there was no rug in the world that would look good in this room, between the color on the walls and the weird color on the floor. I finally broke down crying over it, which in retrospect was pretty stupid. But by that point in my pregnancy, my hormones were telling me that this was a Big Deal and that nothing would be ok until I got the nursery looking nice. Like somehow not only would my baby notice the color of the walls but would also care about it.
So, we revamped the whole nursery around a rug that we found on Overstock.com, the Alexa Chevron Wool Rug in Ivory and Blue. Click HERE to check it out. We really, really like this rug. It's pretty true to color compared to what you see on the website, and the only annoying thing about it is that it does have a chemical-ish smell at first, but other than that, we really love it. So does our cat, when he manages to bust into the nursery.
As a result of the rug choice, we clearly had to repaint the walls, so we picked out a light aqua color, and my very sweet husband went to work. Meanwhile, I worked on a DIY triangle bunting project.
Here are the results:
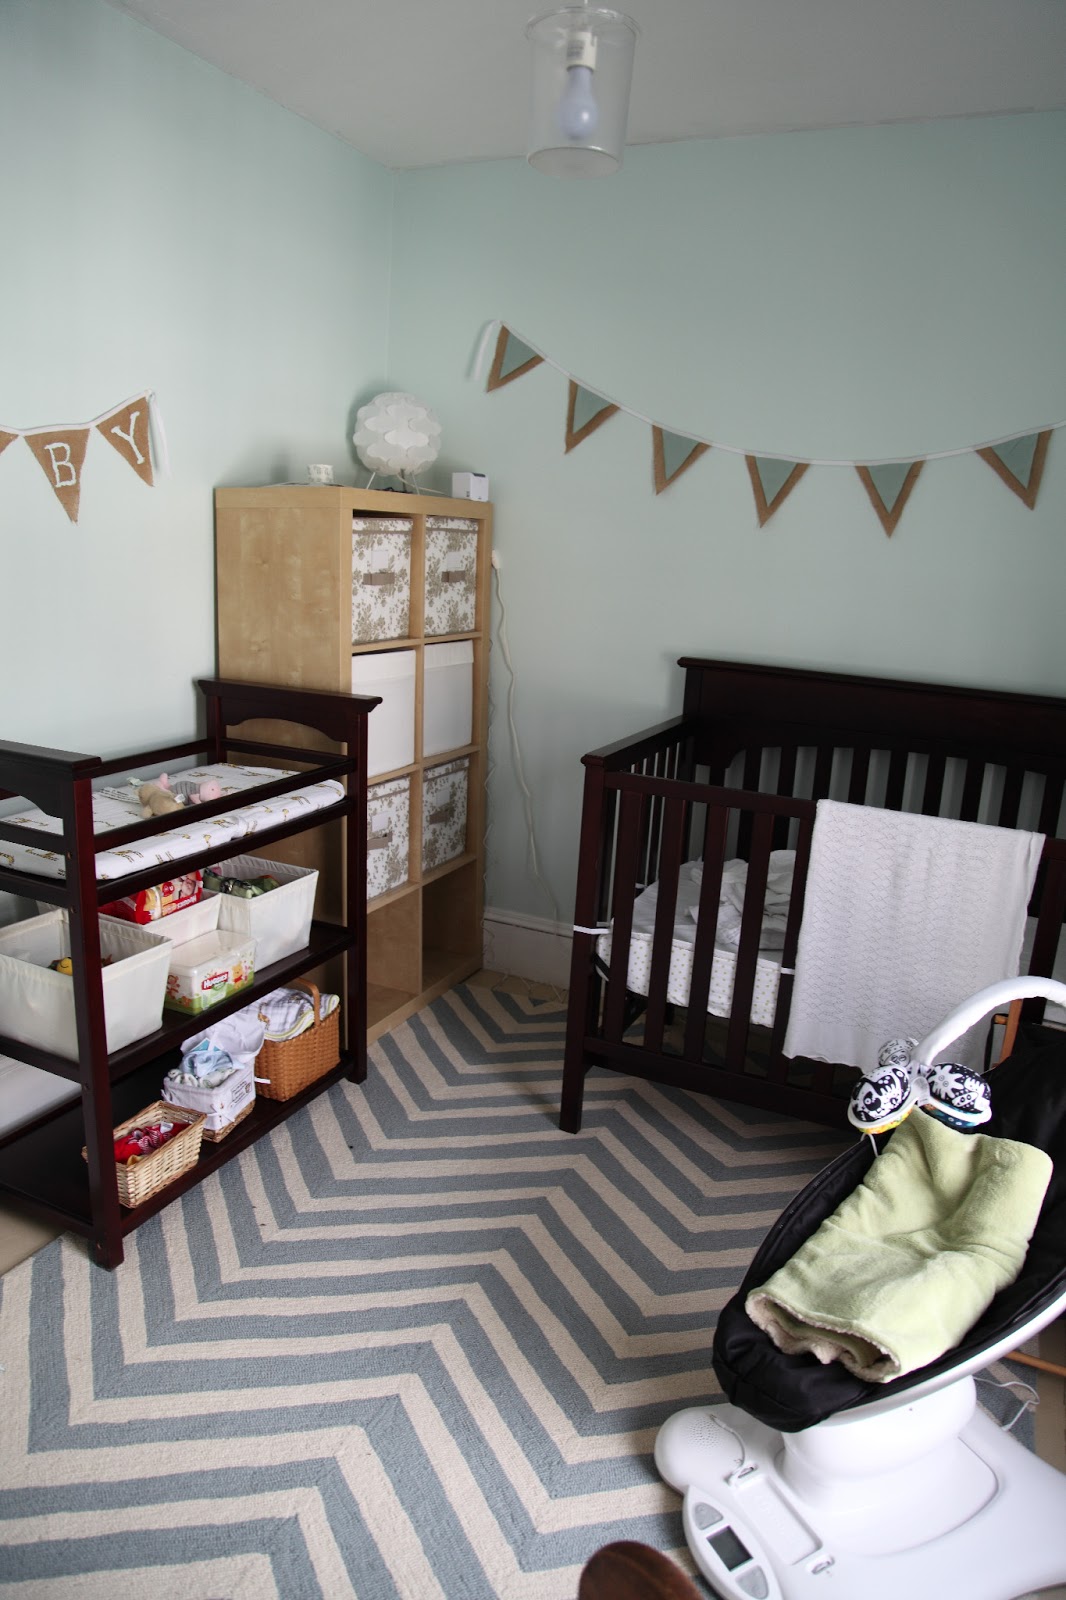 |
| Flag bunting: DIY, Shelving and lamp: IKEA, Crib and dressing table: Graco Lauren collection, swing: Mamaroo (we bought it from Amazon.com) |
 |
| Trouble. |
 |
| Similar mobile here |
 |
| This rocking chair was a gift from my father to my mother for Christmas 30 years ago, when they were expecting me. My mother did much of the re-caning herself, and gave the chair to me for Christmas this year. Such a wonderful gift! A quick google search isn't turning up a lot of new results like this chair, but Ebay has some similar ones. |
I still need to make a new lamp shade, but other than that, it's done. She won't be sleeping in there for a little while, anyway - for now, she's in a bassinet in our room.
The great thing about doing a nursery when we didn't know if we were having a boy or a girl is that it freed us up to put together a room that we like, without feeling pressured to impose some kind of gender-specific nonsense on our kid. And since the baby won't be old enough to have her own opinions about her room for a few years anyway, it seems entirely reasonable that we design the room the way we want it, because she sure as heck doesn't care. Cute as a button, but not really into interior design yet.
Life Lately
It's been an extremely busy 9 months since I last posted. So much so that we have moved 700 miles, bought our first home, and had our first baby.
A whole lot of firsts all at once!
Long story short:
Shortly after my last blog post, we discovered I was expecting a baby in March. This kicked our search for jobs in Maine into super drive, and my husband was offered a job in his new field in early November. They needed him to start in January, so we were fortunate enough to be able to take a little bit of time planning.
On researching apartments in our area, we found that with our particular situation, and the need to accommodate a baby, we would be spending approximately the same in rent as we would on a mortgage. So we started looking at houses. My sister is a realtor, so she looked at the house we liked the most and was very enthusiastic. She did a walk-through, took videos for us, and sent pictures. She and my mom couldn't come up with anything objectionable about it, and based on the pictures, we loved it, so we - and I still can't quite believe this - we put an offer on it. Without ever having stepped foot on the property. And our offer was accepted. *gulp*
We did get to walk through the house the day before we officially purchased it, so in the end it wasn't exactly buying a house "site unseen" - it was more like buying a house online. Still sounds crazy to me, but I guess that's how we roll! We're loving the house big time, so that worked out nicely.
I'm going to do another post regarding my pregnancy and our experiences with the hospital and our practitioners, but long story short (again), that all went well, and we loved the hospital and my midwives. I saw midwives in both Pittsburgh, PA and Portland, ME, so I will discuss both practices.
So now, we are adjusting to life in Maine in our own home with a newborn. She's pretty fabulous and lets us get a decent amount of sleep. Definitely a keeper.
Future posts will cover everything in detail, but for now, here are some snapshots of our new life:
 |
| Buggie steps out in her buggy |
 |
| One of my DIY projects for the nursery |
 |
| Love the frost on the windows |
 |
| Beef burgundy: a blizzard-friendly meal |
 |
| Another nursery view |
 |
| A quiet corner in the guest room |
 |
| Dining room |
 |
| Holding hands with the little one |
Saturday, June 16, 2012
Tutorial: Summery Earrings


If you have a couple of hours and would like to make your own earrings, here's how!
You will need:
-a pack of more than 30 (probably 40 to be safe) beads of your choosing for each pair of earrings you plan to make; I used some 3-mm turquoise beads and some 5-mm red glass beads (I'll post a picture of those at the end.
-a pack of earring bases - whatever kind you like, as long as you can connect a chain to them.
-a matching chain - make sure it's not too fine; otherwise, you won't be able to attach the beads.
-matching head pins - I picked up an 80-pack; that'll cover 2 sets of earrings if you like (you use 30 per pair)
-jewelry pliers with a wire cutter edge (or separate wire cutters) - they're kind of like needle nose pliers but with rounded pincers. If that makes any sense. If not, mine appear in one of the photos, so have a look. Mine also have a wire cutting edge on them; this is crucial. I highly recommend picking up a better pair; you can get the super cheap ones for about 6 dollars, but I don't recommend doing that. Even the nice ones beat the heck out of your hands after an hour, so imagine how the less-nice ones will feel!
-it helps to have a little box as pictured below, to help keep everything corralled in one spot.
I picked everything up at Michael's for about 17 dollars (MINUS the jewelry pliers, which I already had). They were having a great sale on jewelry making supplies, particularly the beads. Don't know if that's still going on, but you can probably either find a coupon or wait for another sale - I am starting to think that anyone who pays full price for everything at Michael's must be actively trying to avoid saving money.
Here are some photos of my supplies:
 |
| I chose these little 3-mm turquoise beads because they just felt so summery |

 |
| I adore this little box. Wish I'd had this while making like 10 pairs of earrings for my wedding... |
 |
| head pins |
 |
| Some of the required materials |
Step 1 - prepare the beads and head pins:
 |
| You will need to trim down the head pins to approximately the length of the ones on the left. |
 | ||
| Put each bead on a head pin and trim the pin to the length shown above. 15 beads for each earring. |
 |
| Start by bending the head pin one way... |
 |
| Then, bend the upper part back to create a hook... |
 |
| ...like so. |
 |
| You should end up with a cute little array of these. |
 |
| Most earring findings or whatever they're called have somewhere you can attach a chain. With these ones, I had to open up this loop just a little bit using my pliers, slip the chain on, and close it again. |
 |
| I LOVE these pliers. |


As I said, I made 2 pairs today. Here are some shots of the red ones in action:


Please let me know if this tutorial needs any further detail or explanation! And let me know if you make some of your own! Please note that you can totally get creative with the length of the earrings (just adjust the number of beads you set up accordingly), as well as the shape - when I made earrings for all the bridesmaids in my wedding as well as for myself, I made a variety of different shapes and sizes. They're on my old computer, so I'll have to dig those up and add them later :)
Sunday, June 10, 2012
Ta Da! Original Art - and other neat stuff
So, we have just put up our first big original art purchase, and it took FOREVER. It's an amazing piece by Geoff Balkman, who was selling his work at the Three Rivers Arts Festival in Pittsburgh. But before the big reveal, here are the before pictures:
The three photographs are from our wedding, and the large, square piece
is a Kandinsky print from the Guggenheim - my husband found the frame at
Ikea on the cheap (genius!). All other frames also on the cheap from
Michael's. The print with the yellow bridges is one of my most ingenious gifts to my husband, who loves Pittsburgh with all his heart. I found it at JHill, where I long to buy just about everything on the site. They have beautiful travel prints inspired by cities the world over, and some iphone covers I am itching to get my hands on.
The painting we purchased is, as all of Balkman's paintings we saw, in multiple pieces, giving a really neat effect. Here it is waiting to be hung on the wall:


While it looked nice on the wall on its own, we kind of felt like the wall needed something, so we flanked it with our other Pittsburgh-themed art, the JHill print and another piece I gave David - a pack of letterpressed Pittsburgh landmark cards that I matted and framed in another Michael's frame using my mat cutter. Sidebar: I just found the etsy shop for the Pittsburgh landmark cards, which I just thought were sold in local shops (lots of places stock them around here) - they have TONS of beautiful stuff! Check them out! Also, the project of cutting the mat and framing the cards was pretty easy, and my husband loooooved it! Click here for the post on our first Valentine's Day as a married couple. And let me know if you'd like to see a tutorial on mat cutting!
So, here's the finished wall - the weird shadow up top is the ghastly chandelier:

And one more photo, featuring the gaudy chandelier. Seriously, is there any uglier light fixture in existence?

I'm quite pleased with how the wall looks, and super thrilled with our purchase. For those of you who don't know Pittsburgh, the painting is of the 16th Street Bridge. It's one of our favorites, so we were pretty psyched when we saw the painting in the seller's stall at the festival. He was a very nice guy and is apparently just starting to sell his artwork. His stuff is great, so once again, do check him out here.
Please do link to your original art purchases and nifty wall decor in the comments!
 |
 |
| Another "before" shot - including our totally hideous 70s chandelier, which our landlord has inexplicably kept all these years |
The painting we purchased is, as all of Balkman's paintings we saw, in multiple pieces, giving a really neat effect. Here it is waiting to be hung on the wall:

 |
| My charming husband obligingly shows off my favorite panel of the painting |

 |
| Progress! |
 |
| Almost there... |
 |
| Done! |
While it looked nice on the wall on its own, we kind of felt like the wall needed something, so we flanked it with our other Pittsburgh-themed art, the JHill print and another piece I gave David - a pack of letterpressed Pittsburgh landmark cards that I matted and framed in another Michael's frame using my mat cutter. Sidebar: I just found the etsy shop for the Pittsburgh landmark cards, which I just thought were sold in local shops (lots of places stock them around here) - they have TONS of beautiful stuff! Check them out! Also, the project of cutting the mat and framing the cards was pretty easy, and my husband loooooved it! Click here for the post on our first Valentine's Day as a married couple. And let me know if you'd like to see a tutorial on mat cutting!
So, here's the finished wall - the weird shadow up top is the ghastly chandelier:

And one more photo, featuring the gaudy chandelier. Seriously, is there any uglier light fixture in existence?

I'm quite pleased with how the wall looks, and super thrilled with our purchase. For those of you who don't know Pittsburgh, the painting is of the 16th Street Bridge. It's one of our favorites, so we were pretty psyched when we saw the painting in the seller's stall at the festival. He was a very nice guy and is apparently just starting to sell his artwork. His stuff is great, so once again, do check him out here.
Please do link to your original art purchases and nifty wall decor in the comments!
Super excited...
...to be planning my post re: our first original art purchase! At the Three Rivers Arts Festival yesterday, my husband and I picked up a painting by the incredibly talented Geoff Balkman - the one we purchased is at the bottom of this link - 16th St Bridge in peach and blue. We are so excited, and we're putting it up on the wall today. Hanging it is a pretty complicated prospect, but I will hopefully have pictures of it in our home to share with you soon!
I should note that I guess it's not really our first original art purchase - we each bought some paintings and ceramics created by the students at the school where we used to teach. We even bought some blown glass vases done by a local artist at the school auction one year. But this was our first time making what we feel is a significant investment in a piece of artwork, and our first time making a joint purchase of original artwork. It'll be showcased in a great spot in our apartment, and our students' work will always be highlighted on our mantlepiece.
Wish me luck - particularly that I don't fall off the chair while hanging this lovely thing!
Friday, June 8, 2012
Northside Farmers' Market
One of my favorite things in the whole world is a good farmers' market. Living in France definitely helped me develop my taste for a wonderful, open-air market - their markets are gorgeous, packed with beautiful produce, expertly-cut meats, a cheese for every day of the year, and countless other marvels. If you're interested, the market in Saint Remy in Provence is just about the most magical place on the planet.
In the States, we haven't quite mastered the farmers' market the way the French have, but we're definitely getting there! A very pleasant part of the green movement is the local food movement, which has really boosted farmers' markets - they're cropping up in places they've never been before, and already-existing markets have grown and become even more fun!
Our local farmers' market is on the Northside in Pittsburgh, and it happens every Friday afternoon - for details, click here. Today's haul included:
-two enormous bunches of carrots
-a bunch of beets
-a large bag of red leaf lettuce
-a head of butter crisp lettuce
-four mini heads of butter crisp lettuce
-6 medium/large tomatoes
-three bulbs of garlic
-a free range chicken
-one spinach pie
-one meat pie
The last two items were devoured on-site and were DELICIOUS. They were from Pitaland, a can't-miss vendor at this market.
Tomorrow, I'll be blogging about that luscious chicken that's sitting in our fridge, so stay tuned. In the meantime, here's a little photo of some of our bounty:

Subscribe to:
Posts (Atom)