Saturday, June 16, 2012

Tutorial: Summery Earrings

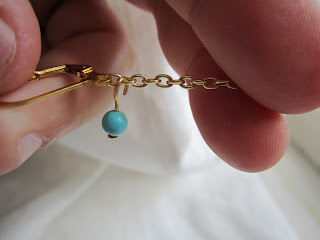
Finding myself wanting something a little more summery, today I made these:


If you have a couple of hours and would like to make your own earrings, here's how!

You will need:
-a pack of more than 30 (probably 40 to be safe) beads of your choosing for each pair of earrings you plan to make; I used some 3-mm turquoise beads and some 5-mm red glass beads (I'll post a picture of those at the end.
-a pack of earring bases - whatever kind you like, as long as you can connect a chain to them.
-a matching chain - make sure it's not too fine; otherwise, you won't be able to attach the beads.
-matching head pins - I picked up an 80-pack; that'll cover 2 sets of earrings if you like (you use 30 per pair)
-jewelry pliers with a wire cutter edge (or separate wire cutters) - they're kind of like needle nose pliers but with rounded pincers.  If that makes any sense.  If not, mine appear in one of the photos, so have a look.  Mine also have a wire cutting edge on them; this is crucial.  I highly recommend picking up a better pair; you can get the super cheap ones for about 6 dollars, but I don't recommend doing that.  Even the nice ones beat the heck out of your hands after an hour, so imagine how the less-nice ones will feel!
-it helps to have a little box as pictured below, to help keep everything corralled in one spot.

I picked everything up at Michael's for about 17 dollars (MINUS the jewelry pliers, which I already had).  They were having a great sale on jewelry making supplies, particularly the beads.  Don't know if that's still going on, but you can probably either find a coupon or wait for another sale - I am starting to think that anyone who pays full price for everything at Michael's must be actively trying to avoid saving money.

Here are some photos of my supplies:

I chose these little 3-mm turquoise beads because they just felt so summery


I adore this little box.  Wish I'd had this while making like 10 pairs of earrings for my wedding...
head pins
Some of the required materials


 Step 1 - prepare the beads and head pins:

You will need to trim down the head pins to approximately the length of the ones on the left.


Put each bead on a head pin and trim the pin to the length shown above.  15 beads for each earring.

 Step 2 - bending the head pins.  You're going to need to create little hooks on the end of each one.

Start by bending the head pin one way...

Then, bend the upper part back to create a hook...

...like so.

You should end up with a cute little array of these.
 Step 3 - attaching the chain to the earring.  You will need to cut a length of chain with 16 links - one for attaching to the earring, and then 15 more, one for each bead.

Most earring findings or whatever they're called have somewhere you can attach a chain.  With these ones, I had to open up this loop just a little bit using my pliers, slip the chain on, and close it again.

I LOVE these pliers.
 Step 4 - attaching the beads.  Stick the hook through the link of the chain (starting right below the link that fastens to the earring base), and close, using the pliers.  Work your way down the chain, attaching them in a spiraling pattern around the chain as you go.  It was impossible for me to photograph this with just my two hands at work, but it should make sense once you have the project in hand; if not, I can try and persuade my husband to help me get some better pictures.


It'll get tough toward the end as there's less chain to hold on to, but with a little bit of patience, you'll get through it.

As I said, I made 2 pairs today.  Here are some shots of the red ones in action:


Please let me know if this tutorial needs any further detail or explanation!  And let me know if you make some of your own!  Please note that you can totally get creative with the length of the earrings (just adjust the number of beads you set up accordingly), as well as the shape - when I made earrings for all the bridesmaids in my wedding as well as for myself, I made a variety of different shapes and sizes.  They're on my old computer, so I'll have to dig those up and add them later :)

Sunday, June 10, 2012

Ta Da! Original Art - and other neat stuff

So, we have just put up our first big original art purchase, and it took FOREVER.  It's an amazing piece by Geoff Balkman, who was selling his work at the Three Rivers Arts Festival in Pittsburgh.  But before the big reveal, here are the before pictures:

 
 The three photographs are from our wedding, and the large, square piece is a Kandinsky print from the Guggenheim - my husband found the frame at Ikea on the cheap (genius!).  All other frames also on the cheap from Michael's.  The print with the yellow bridges is one of my most ingenious gifts to my husband, who loves Pittsburgh with all his heart.  I found it at JHill, where I long to buy just about everything on the site.  They have beautiful travel prints inspired by cities the world over, and some iphone covers I am itching to get my hands on.

Another "before" shot - including our totally hideous 70s chandelier, which our landlord has inexplicably kept all these years

The painting we purchased is, as all of Balkman's paintings we saw, in multiple pieces, giving a really neat effect.  Here it is waiting to be hung on the wall:


My charming husband obligingly shows off my favorite panel of the painting


Progress!

Almost there...

Done!

While it looked nice on the wall on its own, we kind of felt like the wall needed something, so we flanked it with our other Pittsburgh-themed art, the JHill print and another piece I gave David - a pack of letterpressed Pittsburgh landmark cards that I matted and framed in another Michael's frame using my mat cutter.  Sidebar: I just found the etsy shop for the Pittsburgh landmark cards, which I just thought were sold in local shops (lots of places stock them around here) - they have TONS of beautiful stuff!  Check them out!  Also, the project of cutting the mat and framing the cards was pretty easy, and my husband loooooved it!  Click here for the post on our first Valentine's Day as a married couple.  And let me know if you'd like to see a tutorial on mat cutting!

So, here's the finished wall - the weird shadow up top is the ghastly chandelier:


And one more photo, featuring the gaudy chandelier.  Seriously, is there any uglier light fixture in existence?


I'm quite pleased with how the wall looks, and super thrilled with our purchase.  For those of you who don't know Pittsburgh, the painting is of the 16th Street Bridge.  It's one of our favorites, so we were pretty psyched when we saw the painting in the seller's stall at the festival.  He was a very nice guy and is apparently just starting to sell his artwork.  His stuff is great, so once again, do check him out here.

Please do link to your original art purchases and nifty wall decor in the comments!

Super excited...

...to be planning my post re: our first original art purchase!  At the Three Rivers Arts Festival yesterday, my husband and I picked up a painting by the incredibly talented Geoff Balkman - the one we purchased is at the bottom of this link - 16th St Bridge in peach and blue.  We are so excited, and we're putting it up on the wall today.  Hanging it is a pretty complicated prospect, but I will hopefully have pictures of it in our home to share with you soon!

I should note that I guess it's not really our first original art purchase - we each bought some paintings and ceramics created by the students at the school where we used to teach.  We even bought some blown glass vases done by a local artist at the school auction one year.  But this was our first time making what we feel is a significant investment in a piece of artwork, and our first time making a joint purchase of original artwork.  It'll be showcased in a great spot in our apartment, and our students' work will always be highlighted on our mantlepiece.

Wish me luck - particularly that I don't fall off the chair while hanging this lovely thing!

Friday, June 8, 2012

Northside Farmers' Market

One of my favorite things in the whole world is a good farmers' market.  Living in France definitely helped me develop my taste for a wonderful, open-air market - their markets are gorgeous, packed with beautiful produce, expertly-cut meats, a cheese for every day of the year, and countless other marvels.  If you're interested, the market in Saint Remy in Provence is just about the most magical place on the planet.

In the States, we haven't quite mastered the farmers' market the way the French have, but we're definitely getting there!  A very pleasant part of the green movement is the local food movement, which has really boosted farmers' markets - they're cropping up in places they've never been before, and already-existing markets have grown and become even more fun!

Our local farmers' market is on the Northside in Pittsburgh, and it happens every Friday afternoon - for details, click here.  Today's haul included:
-two enormous bunches of carrots
-a bunch of beets
-a large bag of red leaf lettuce
-a head of butter crisp lettuce
-four mini heads of butter crisp lettuce
-6 medium/large tomatoes
-three bulbs of garlic
-a free range chicken
-one spinach pie
-one meat pie

The last two items were devoured on-site and were DELICIOUS.  They were from Pitaland, a can't-miss vendor at this market.

Tomorrow, I'll be blogging about that luscious chicken that's sitting in our fridge, so stay tuned.  In the meantime, here's a little photo of some of our bounty:


Thursday, May 31, 2012

The National Aviary: Review


I should open this post with a quick disclaimer and state that I have a personal connection to the National Aviary, so I'm a little biased.  Nonetheless, I wanted to write about it, because I really do feel that it's an extraordinary place worthy of attention and accolades. 

The facility, located on the North Side of Pittsburgh, has undergone some major changes and additions, and they continue to renovate exhibits frequently.  This is always done with the birds' happiness in mind, accommodating their need for stimulation in their spaces.  In fact, the birds' happiness and well-being are truly of utmost importance at the Aviary.  My experience with their practice behind-the-scenes is totally consistent with that idea - they have fine-tuned their training practices, trainers are constantly providing new activities for the birds to keep them engaged and active, and even the volunteers and interns undergo extensive training to ensure the safety and comfort of the birds.  And don't even get me started on the incredible veterinary staff.

I have always felt that zoos are a "necessary evil" - that while it's not ideal to keep an animal in an artificial environment rather than out in nature, we need zoos to educate and to inspire.  The Aviary really embodies this - their educational programming is absolutely fantastic, and really targets different age groups well.  It's a great way for kids of all ages to learn about the birds and about preserving the natural habitats of all creatures for the future survival of at-risk species. 

One of the greatest things at the Aviary is their devotion to the Species Survival Plan.  Staff members are very knowledgeable about this program, and many of the birds at the Aviary are part of the plan.  It's a collaboration between zoos the world over to preserve both numbers of individuals and genetic diversity of the population (in order to ensure strong offspring).  The African Penguins and Guam Rails recently hatched at the Aviary are examples of the success of this program.

Stepping off my soapbox now, the main point about the Aviary is that it's just such a neat place to be!  The different environments that visitors walk through seem to have their own unique moods and rhythms.  My favorites are the tropical rainforest and the grasslands - both spaces are usually active yet mellow. 

Here are my photos from today, using my shiny new camera:


Benito the Hyacinth Macaw shows off for the camera

White-Cheeked Turaco

Burrowing Owl

African Penguin - this is one of the recently-hatched young'uns!

 Adult African Penguins 

Shaft-Tail Finches

African Gray Parrot

Inca Tern

Victoria Crown Pigeon

Guam Rail

Cape Thick-Knee


This is just a snippet of what's on offer at the Aviary.  Better yet, there are interactive feedings run by the trainers, where guests can even get a chance to feed a bird.  There are also fantastic bird shows, run by an extremely capable show staff.  The training process for the shows is absolutely amazing, and very intense.  Since training must be consistent across the board, there is a very precise training protocol that the staff follows. 

The Aviary has great summer programming, as well as some summer camp sessions, and tours for large groups.  Wing your way over to their website for more information!

Thursday, May 24, 2012

Our Cats

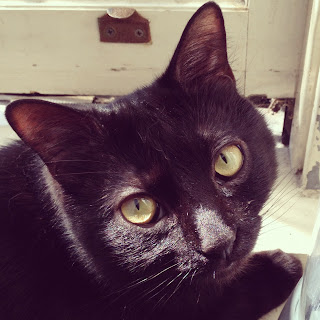
I thought I'd do a little post about our two charming-but-very-stupid cats, I'll call them Big One and Little One.  Big One is my husband's cat since before I was even on the radar.  He is enormous, plus he is slightly overweight, which definitely exaggerates his already-large self.  We believe he's mostly a Maine Coon cat, or possibly a Norwegian Forest cat.  Personally, I like the romance of the Norwegian Forest imagery, so I'm going to go with that.  Little One is my cat, and we got him when my husband and I first moved in together.  He's a very cute little short haired black cat with a few white patches on his belly.

Here are some photos, starting with the glamour shots:


...and then some of their less glamorous moments:
To be fair, my husband set him up for this by filling Little One's house with catnip.  Big One could not resist.  In his defense, the camera really does seem to have added 10 pounds here.  Especially when you compare the cat with that tiny little house, which is just barely big enough for Little One.


Little One, right after we got him.  He is in love with all things he can climb into.

This was Big One's super-stealth hiding spot for some time, back when we had these horrible old hampers.  Totally convinced that no one could see him in there, he would occasionally do a vertical leap out of the hamper and pounce on whatever pair of legs happened to be passing.

An action shot.  Little One goes for the party ribbon, which he promptly threw up all. over. the. apartment.

Investigating the cooler bag

Don't tell me this thing wasn't designed as a bed for me.

This is a frequent sight in the winter - furniture coated with Big One's hair, with Little One in a tiny little ball.

I can doez my cute facez now.
Aaaand I just became the crazy cat lady.

I may or may not have time to post anything this weekend, as we have family coming to visit this weekend!  It'll be very exciting, and I'm sure I'll have plenty to post next week!